Redirect Functionality in Infowise Ultimate Forms: More Than Just ‘Go Back to List’
When users submit or cancel a form in SharePoint, the default behavior is usually to return to the list. But in many real-world scenarios, this isn't enough. You might want a custom thank you page, or display the item just created, or provide further editing options. Redirect functionality in Infowise Ultimate Forms gives you control over where users go after key form actions. This means more intuitive user flows, better clarity, and more polished experiences.
Let’s walk through the types of redirect options, how they differ, when to use each, and examples of how organizations can benefit.
What Are Redirects & Why They Matter
A “redirect” defines what happens after a user does something in a form—usually either Save (or Save + Edit / Save + New) or Cancel. Redirects are powerful for guiding users, reducing confusion, improving user satisfaction, and controlling navigation. Without appropriate redirects, users may end up in unexpected places, or lose momentum after completing a form.
Key reasons to use them:
-
Improve UX: users know what’s coming next.
-
Branding & Engagement: thank you pages, follow-ups, etc.
-
Business logic: redirect based on user role, status, or form type.
-
External forms or forms embedded elsewhere often need custom destinations.
Types of Redirects Available in Ultimate Forms
Infowise Ultimate Forms supports multiple redirect options—and flexible settings so you can tailor behavior.
1. Global Redirects
These are settings that apply broadly for a form’s Save or Cancel buttons (unless overridden). They are defined in the form’s Redirects settings in the Form Designer toolbar. You configure what happens for:
-
Saving the item
-
Cancelling the action
Within Save, you can further choose where to redirect. Options include:
-
Default: go back to the list view
-
Display: show the newly added or updated item in its display form
-
Edit: open the item in Edit mode after Save
-
New: after Save open a New form (for entering another item)
-
Custom URL: redirect to a URL you supply (this could be a page internal to SharePoint or external site
-
Thank You page: specially designed read-only form view you can create directly in Form Designer
These global redirects are great for basic, consistent behavior across all saves / cancels.
2. Button‐Level Redirects
Buttons are another redirect lever. If your form has custom buttons (Save, Cancel, Print, or other button types), you can configure those buttons not only for what they do (save, trigger actions, etc.) but also to override the global redirect settings. That means when a specific button is clicked, the user can be redirected to:
-
Display form
-
Edit form
-
New form
-
Default (list view)
Button redirects always take precedence over global redirects. So you can have multiple save‐type buttons each leading users to different post‐save experiences. For instance, “Save and View” might show the Display form, whereas “Save and Add Another” redirects to a fresh New form.
3. Separate Redirects for Save vs. Cancel
Often Save and Cancel should do different things. You may want:
-
Save → thank you page, or show the item
-
Cancel → return to list, or go to homepage
The Cancel redirect can also be customized in Form Designer settings. This helps prevent frustration if a user abandons a form and wants a different exit route.
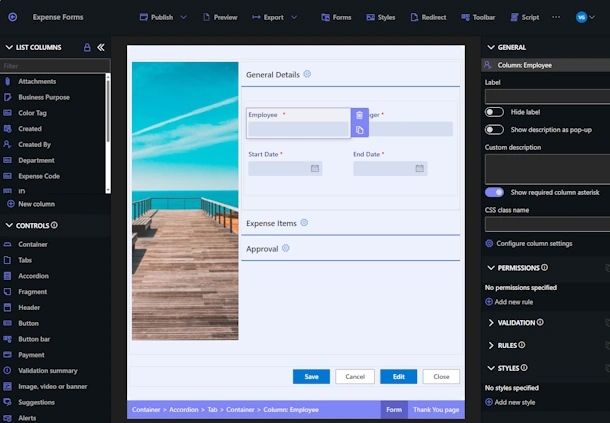
4. Thank-You Pages
A special flavor of redirect is using a Thank You page. This is a page designed specifically to thank a user for submitting a form, potentially show data from their submission, next steps, or further actions. Ultimate Forms lets you craft these within the Form Designer: you’re not limited to generic messages—you can use form controls, fragments (help text or display content), tabs, styles, buttons, etc.
Thank-You pages are particularly useful when you don’t want the user to see the list or the item, or when you want a more polished, branded finishing step. For example, after submitting a feedback form, you might show a thank you page that also shows their submission summary, links to related resources, or offers share options.
How It Works: Setting Up Redirects
Here’s a more granular walkthrough of configuring redirects in Ultimate Forms.
-
Open Form Designer for the list you want to configure by clicking on the Design button
-
In the toolbar, locate the Redirects button.
-
Choose your global redirect options:
-
For Save event: pick Default / Display / Edit / New / Custom URL
-
For Cancel event: similarly choose where to go
-
-
If using custom buttons: place a Button control in the form (from available controls), select its type, and configure what happens when that button is clicked—and optionally override redirect behavior.
-
For Thank You pages: switch the designer to “Thank You page mode” (bottom right of the design canvas), design the page (using any available UI / fragment / controls you like), then set the redirect for your form’s Save-New form or Save event to go there.
Note: It’s important to test the redirect in different contexts—New vs Edit vs Display forms, cancel vs save, mobile vs desktop—so you catch any behavior that surprises users.
Real-Life Usage Examples
Here are some scenarios to illustrate redirect usage in real environments:
Example A: Customer Feedback / Contact Form
-
After the user submits feedback, redirect them to a Thank You page that includes dynamic content: “Thank you for your feedback, [Name]!” plus display their submitted feedback summary.
-
If they cancel (i.e., decide not to submit), redirect back to the main site homepage or help center.
Example B: Event Registration Workflow
-
User fills out registration form. On Save, redirect to Display form of their registration so they can edit or review.
-
Also provide a button “Save & Register Another” that after saving opens a fresh New form.
-
If the user cancels, send them back to the event listing page rather than the full registration form.
Example C: Public / External Forms
-
Forms exposed to external users: after submission, you want a customized thank you page (perhaps external site or page without SharePoint navigation). External forms are intended to be used by anonymous external user and do not normally provide access to the list view.
-
Redirects help control that experience so external users see appropriate UI.
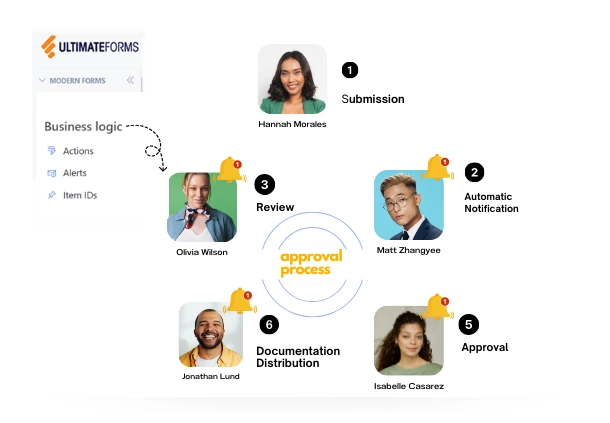
Example D: Internal Process / Approvals
-
Employees submit a request. After submission, redirect them to the newly created item in Display form so they can track status.
-
Approvers use a “Approve and Save” button which updates status and redirects to a summary dashboard rather than the form again.
-
Cancel buttons on forms in certain stages send users back to a tasks overview rather than original form.
Benefits & Trade-Offs
Using redirects well brings several advantages, but also some things to be aware of.
Benefits
-
Better user experience: User flows are smoother, less jarring.
-
Clarity: Users know what happened and where to go next.
-
Branding / Information: Thank you pages or display forms allow you to surface additional info.
-
Security / Permissions: You can control what content users see after actions.
-
Flexibility: Different buttons or workflows can redirect differently.
Considerations / Potential Drawbacks
-
Complexity: With many custom buttons each redirecting differently, forms can become complex to maintain.
-
Testing Burden: Need to ensure all possible combinations (save/cancel, new/edit/display, roles) behave correctly.
-
URL Management: If using custom URLs, have to manage links, ensure they’re valid, handle migrations or site URL changes.
-
Permissions: Redirecting to display/edit forms requires the user to have read/edit permissions respectively; otherwise the user may hit errors.
-
Mobile / Web Part Embedding Contexts: Redirect behavior inside web parts or embedded content might differ; always test in actual user context (mobile, Teams, embedded forms) to verify.
Best Practices for Redirect Strategy
| Practice | Why It Helps |
|---|---|
| Use descriptive button names | Buttons like “Submit and View” or “Save and New” help users understand what will happen. |
| Keep Cancel paths intuitive | A Cancel should never leave a user in limbo; redirecting somewhere useful avoids confusion. |
| Consider permissions & audience | Avoid redirecting to pages the user may not have access to. For external forms, avoid internal admin-style pages. |
| Use Thank You pages wisely | Make them meaningful—include next steps, personalize if possible, keep them simple. |
| Consolidate settings where possible | If many similar forms, use shared or consistent redirect URLs to reduce maintenance. |
| Document redirect behavior | For admins & support—so when someone adds a new button or changes redirect, it’s known. |
Advanced Redirect Use Cases
-
Conditional Redirects Based on Form Data: For example, after submission if “Priority = High” redirect to an escalation page; else redirect back to list. Ultimate Forms allows setting custom buttons with redirect logic, though global redirect settings are simpler.
-
Sequential Redirects / Follow Ups: E.g., after Save, show Display form; then provide a link or button to navigate further. Or after display, allow edit, etc.
-
Embedding Forms in Pages or Teams with Redirects: If you embed the form via web part, ensure redirect URLs take users to pages visible in that site; or integrate Thank You page that matches your brand or site structure.
-
External Forms: Public forms or customer portals where Save takes you to public page, not internal list. Redirect settings govern external user experience carefully.
Summary
Redirect functionality in Infowise Ultimate Forms is a key UX tool that lets you mold the post-save/cancel journey to suit business needs. Between the global redirect settings, custom buttons, and Thank You pages, you can build forms that feel intuitive, clean, and branded—not just functional. The flexibility means you can support internal users, external users, different workflows, and maintain consistent behavior.
By planning redirects carefully—choosing where users go, what they see afterward, and how they exit—you make SharePoint forms more polished, less confusing, and more powerful.
Add your comment